Install the app
How to install the app on iOS

Follow along with the video below to see how to install our site as a web app on your home screen.

Note: This feature may not be available in some browsers.

Panthera FX Repair Tip Thread - please Post Your Solutions Here.

Billm

Grand HAMster
2,801
10,710
Florida Panhandle
HAM Points
11,038.50
Country flag
There’s not a lot of FX specific repair help online. So I thought a Thread here to warehouse repair tips and solutions might help. Please try to just post your solutions here and not your questions, unless they relate directly to the solution, The idea is to make it easy to find repair solutions. I found HAM looking for solutions for my Beeman underlever and my Barra 250z. For the 250z @Pumacarl thread on upgrading his 250z popped up in google and I’ve been a pest here ever since.
 
Last edited:
My FX Panthera MKII is leaking from below the magazine in the chamber. I need to look at and possibly replace the o-ring behind the valve seat which requires special tools. Here is my solution so far:
I bought the 910tool to remove the cover. It wouldn’t line up with the two holes. The local Harbor Frieight said they had a few different sets of snap-ring pliers in stock. But, when I went down there all the pegs were empty. I ended up using a pair of large needle nose pliers whose tips fit snuggly. It came off easily at the point. The front valve pin o-ring and the delrin pin guide didn’t look seated properly, but that may have been just from pulling the cover off. I have o-rings and the 2 extra valve pins, but not the delrin washer. I’m going to polish the stem on one of the new valve stems and replace it and the o-rings, just because I have them and I’m there. If anyone develops some velocity swings and doesn’t think it’s their regulator, the valve stem is worth looking at. It’s a known issue and my valve stem looks a little rough in places where it might stick.

The next issue is removing the valve seat. The 910 tool is not available anywhere. The valve seat is just held in by an o-ring. So sssuming it’s a tight fit, the various solutions are to make something that will grip the housing from the inside without scratching the internal walls. I’m assuming with some wiggling you just have to be able to work it back out without letting it go. The 910 tool accomplishes this by using a machined aluminum tube as a grip, at the end he has a machined terraced (stepped) Delrin* top hat. The terraced top hat is his magic. FX has different diameter Valve seat Housings. Each terrace or step is the diameter needed to fit one of the different housings. At this point we only care about the one step that fits the Valve Seat Housings for the Dynamic Block. The idea is that you insert the tool and push down, the top hat will seat into the housing and the next larger terrace will prevent the tool from going any deeper into the housing. The 910 also has a hole to allow you to guide the valve pin into the housing when reassembling. Airbuks (YouTube) has a simpler solution. He refuses to show how to remove the Valve Seat Housings I his assembly video. He states that it’s a job for the factory due to the likelihood of damaging the small O-ring and the difficulty of replacing the O-ring. Interestingly Ernest Rowe states the same thing in his video. But, Airbuks does mention and demonstrate how his custom removal tool solution works. He simply makes a partially split plastic hollow tube slightly smaller diameter than the housing. He then threads a long hex cap head machine through the Center of the tube. You insert the tool into the housing and turn the screw until the split tube expands the tube until there is a tight enough friction fit to allow you to pull back on the screw and pull the housing free. If you’ve ever used a plastic expanding wall anchor it’s easy to imagine how it works. As a matter of fact a trip to a hardware store could probably provide a simple removal tool using a wall plug. I’d sand the plug down and wrap a couple of o-rings around the plug that would give a slightly less than snug fit and they would grip the housing firmly and safely when you turn the screw. My fear is that grit trapped on the plastic might scratch the housing wall. If you gouge the wall it’s probably ruined. Using o-rings would provide grip and be easy on the walls.

*Delrin plastic is a high-performance acetal homopolymer (POM) known for high mechanical strength, low friction, and great dimensional stability. It is often used to replace metal parts like gears, bearings, and bushings. it is also easily machined with precision industry. It’s the gold standard for plastic gears under stress where you don’t want the mass of metal. It is considered self-lubricating.
 
I didn’t ever want an FX, then read HAM reviews and posts in the community then perhaps I would like an FX.

Reading about all this fun stuff, maybe I don’t 😵‍💫, when I was a kid my grandfather told me that I was gluttonous for punishment lol. I’m older now, so hard pass.
I'm a glutton LOL. Sometimes I wonder if Im expecting too much. Keep an open mind for now. I know it's hard when reading posts like mine. I try to be as honest as I can. I know I'm not always right but there's no mistaking that the finish is not there and that the threads are rough. But, box stock I think this rifle is the most accurate rifle that I own and is easy to tune. I think you'd be happy with how it shoots box stock. I don't know if you even need to replace the regulator unless you want a more efficient refresh. I'm 3d printing a valve seat removal tool right now. If it works I will probably just put it back together minus the bull barrel for now, until I can address the thread issue. It shoots both pellets and slugs with no effort. The weird part is that there is almost radio silence about the Dynamic Block MKII based airguns. The only only activity is the FX affiliated YouTube videos coming out of South Africa. That's good fun information, but I wish there were more posts by average users. As much as I get frustrated, I might get bored if there was nothing to work on.
 
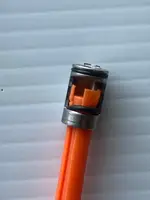
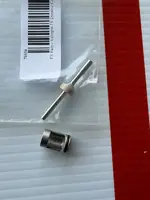
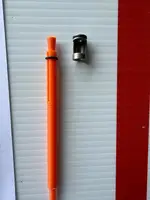
This my first iteration of an FX valve seat removal tool for the Dynamic block. I haven’t tried it yet. That is the piece (new) it is designed to help you remove. I’ve tried it in the replacement and I’m just printing a revised one with a wider groove for the o-ring. It seems like it will work and gives a tight grip with no other tools or metal screws required. Thirty minutes to design and create a 3d model. Forty eight minutes to print. If it works, it’s a win-win.
 

Attachments

  • IMG_7445.webp
    IMG_7445.webp
    120.1 KB · Views: 4
  • IMG_7446.webp
    IMG_7446.webp
    54.9 KB · Views: 4
  • IMG_7447.webp
    IMG_7447.webp
    68.6 KB · Views: 4
Success! I easily removed the FX Valve Seat with my simple custom tool. I can see the small o-ring in the center where the valve stem floats, blown out. I have a new replacement seat with already installed o-rings. I’m not even going to mess with the o-rings. I’m going to replace the Valve Seat and the Valve stem/pin. I’m assuming I should apply a dab of silicone grease on the shaft after polishing. I’m not really sure. IMG_7458.webpIMG_7463.webpIMG_7466.webpIMG_7462.webp
 
Nice work Bill! I need just a little bit more frustration in my life before I breakdown and get a 3D printer. There are a lot of times that it would have been very helpful. I really like how you've made use of yours. It examples like yours, more than my own problems, that will probably push me over the edge. It seems that all I'm doing lately is fixing things. It takes so much time that I don't want to lose any more learning a whole new thing. I was going to offer to send you my valve tool, but you've got the best tool already, cleverness.
 
Last edited:
Nice work Bill! I need just a little bit more frustration in my life before I breakdown and get a 3D printer. There are a lot of times that it would have been very helpful. I really like how you've made use of yours. It examples like yours, more than my own problems, that will probably push me over the edge. It seems that all I'm doing lately is fixing things. It takes so much time that I don't want to lose any more learning a whole new thing. I was going to offer to send you my valve tool, but you've got the best tool already, cleverness.
Thanks. A $200 Bambu Labs printer will pay for itself. But, they’re another thing that needs attention from time to time. I’m leaking now from underneath the valve housing cover. So, I’m getting ready to pull it apart again. The special tool that I purchase doesn’t fit into the holes, I ran out and bought a $15 pair of snap ring pliers and the pins are to small and don’t help much. I’ll probably make a trip to HD and see what they have. I’ll have to replace the cover because it’s all scratched from using the makeshift tools. Hopefully, I’ll pull the cover off and replace the o-ring and that’ll do it.
 
Last edited:
It’s appears (knock on wood) not to be leaking. I removed the valve housing and replaced the o-ring between it and the block. There doesn’t seem to be a leak. I reassembled it using the 1:40 liner and standard barrel tube. I cleaned the threads on the bull barrel the best that I could. Debating on where or not to swap to the Bull Barrel. Several lessons learned. There’s probably a half dozen different ways to make a simple tool to remove the valve seat. The key is realizing that it is just held in place by a tight o-ring. You are just looking for a way to grip the valve seat from the inside without scratching the internals. If you really need to send it back to do this, you might reconsider working inside the high pressure system. That’s not a slam for anyone that feels it would be easier to send it back. I’m just pointing out that removing the assembly is the easy part. It’s all just time consuming. But, my only experience with sending an air rifle back meant a 4-6 week wait with shipping etc..
This last leak was silly on my part. I replaced close to a $100 worth of parts and o-rings, most of which probably didn’t need to be replaced. But, I was inside and figured that was the safe thing to do. Yet, I didn’t replace the o-ring around the threads of the housing. I figured: how can that be bad it’s been tightened twice. It should have been replaced just in case, because “case” came😂.
 
I totally agree with your comments on doing the work yourself. When I think of shipping one these guns out, and all that is involved with doing that, and then the time that it takes in total, and risk, on what planet is that actually easier than just doing it youself in a day, or two at most? This is why the first thing that I do when I get a new gun, after I know that it does in fact function, is void the warranty somehow because I don't want sending it back to be an option to even waste my time thinking about. Warranties don't last either, best to learn about my purchase right up front and how to keep it running.
 

Create an account or login to comment

You must be a member in order to leave a comment

Create FREE account

Create a FREE account on our community. It's easy!

Log in

Already have an account? Log in here.

Trending in this forum

Back
Top