
Install the app
How to install the app on iOS

Follow along with the video below to see how to install our site as a web app on your home screen.

Note: This feature may not be available in some browsers.

Others Looking for help with 3622 leak

CMHP123

HAM Plinker
10
31
HAM Points
73.00
Country flag
Hello folks,

I have a Crosman 3622 which has about 1,700 pellets through it and it has held up great so far. Recently I noticed that it was losing about 300 to 1000 psi after a couple of days in storage and I discovered that the front fill-port was not screwed in tight, so I thought "Alright, simple fix." I degassed the gun and unscrewed the fill-port end cap, cleaned the threads and did a quick swab down the cylinder to get rid of the moisture while I had it open. That is all I took apart. I put the fill-port end cap back on and cocked the bolt to alleviate the hammer pressure for the initial fill (something I've done before for first fills).

This is where it gets weird. I have no leak from the end cap, but I now have a very fast, audible leak at these two holes. The hole in the top of the red circle is where the front trigger unit screw threads in, and I'm not sure what the other hole is for, but it cants at an angle on the bolt side of the gun:

1763313321732.webp

I am new to the 3622/2240 line of products, and I have not taken apart anything in the hammer spring or valve part of the gun. I had degassed the gun before when adding the steel breech, and I didn't have any leaks when I did that. Did I bump something while I was swabbing the air cylinder? I don't think I did.

I would love to hear from those with more experience working with this or similar platforms. Thanks!
 
I don't know anything, but just giving you something to consider. When you say it leaks from those holes, that may be where air is escaping, but not necessarily where the leak is. Second, Crosman usually has exploded diagrams of their guns on the service portion of its website. That may help you track down what might be leaking air. Good luck, and I look forward to others' responses.
 
I don't know anything, but just giving you something to consider. When you say it leaks from those holes, that may be where air is escaping, but not necessarily where the leak is. Second, Crosman usually has exploded diagrams of their guns on the service portion of its website. That may help you track down what might be leaking air. Good luck, and I look forward to others' responses.
Good distinction about leak versus location of escape. I have tried looking into 3622 parts diagrams and the best I can find is a partial diagram from the HAM article Crosman 3622 Air Rifle Secrets Revealed, Part Two:


Also, this YouTube disassembly video looks pretty helpful if I need to take it down any further:

To view this content we will need your consent to set third party cookies.
For more detailed information, see our cookies page.
 
It looks like it's the valve oring.

John
Thanks for the input. I am pretty sure I know where the valve oring is and how to get to it based on the disassembly video I watched, but it looks like I will have to take out the hammer spring assembly.

The problem is, I don't have a chronograph and I have never messed with an airgun hammer spring before. I'm afraid I would not be able to put it back to the factory spec. Any thoughts on how I might address this? Is there a specific amount of turns that I could reassemble the hammer screw to if I did disassemble the gun? I am very willing to try.
 
Thanks for the input. I am pretty sure I know where the valve oring is and how to get to it based on the disassembly video I watched, but it looks like I will have to take out the hammer spring assembly.

The problem is, I don't have a chronograph and I have never messed with an airgun hammer spring before. I'm afraid I would not be able to put it back to the factory spec. Any thoughts on how I might address this? Is there a specific amount of turns that I could reassemble the hammer screw to if I did disassemble the gun? I am very willing to try.
You don't have to take the hammer spring adjuster out to remove the tube plug.
You can also sent it in to Crosman or Airgun Revisions for repair.

John
 
Good distinction about leak versus location of escape. I have tried looking into 3622 parts diagrams and the best I can find is a partial diagram from the HAM article Crosman 3622 Air Rifle Secrets Revealed, Part Two:


Also, this YouTube disassembly video looks pretty helpful if I need to take it down any further:

To view this content we will need your consent to set third party cookies.
For more detailed information, see our cookies page.
I highly recommend Al's. He does a great job of explaining.
 
Thank you to those who have replied so far. The tip that taking out the back end-cap would not change the spring tension was very helpful. I took the gun apart further and found that the valve had corrosion and a build-up of white residue that was pushing the o-ring out of alignment.

1763429157300.webp

I cleaned it up as best as I could and oiled the o-ring with silicone oil (it's what I had on hand). I reassembled the tank and it holds pressure! Woohoo!

Now I have a new issue: the bolt is much stiffer than it was before. I messed with it all afternoon (disassembled/reassembled many times, tried oil and different screw tension). It feels like metal is binding somewhere. If I can get this figured out, I should be good.
 
Thank you to those who have replied so far. The tip that taking out the back end-cap would not change the spring tension was very helpful. I took the gun apart further and found that the valve had corrosion and a build-up of white residue that was pushing the o-ring out of alignment.

View attachment 17461

I cleaned it up as best as I could and oiled the o-ring with silicone oil (it's what I had on hand). I reassembled the tank and it holds pressure! Woohoo!

Now I have a new issue: the bolt is much stiffer than it was before. I messed with it all afternoon (disassembled/reassembled many times, tried oil and different screw tension). It feels like metal is binding somewhere. If I can get this figured out, I should be good.
Man that was nasty. Maybe beef up your pcp compressors air filtration system as too much moisture is getting in your gun? I've got 3 on my main compressor.
 
Hello folks,

I have a Crosman 3622 which has about 1,700 pellets through it and it has held up great so far. Recently I noticed that it was losing about 300 to 1000 psi after a couple of days in storage and I discovered that the front fill-port was not screwed in tight, so I thought "Alright, simple fix." I degassed the gun and unscrewed the fill-port end cap, cleaned the threads and did a quick swab down the cylinder to get rid of the moisture while I had it open. That is all I took apart. I put the fill-port end cap back on and cocked the bolt to alleviate the hammer pressure for the initial fill (something I've done before for first fills).

This is where it gets weird. I have no leak from the end cap, but I now have a very fast, audible leak at these two holes. The hole in the top of the red circle is where the front trigger unit screw threads in, and I'm not sure what the other hole is for, but it cants at an angle on the bolt side of the gun:

View attachment 17437

I am new to the 3622/2240 line of products, and I have not taken apart anything in the hammer spring or valve part of the gun. I had degassed the gun before when adding the steel breech, and I didn't have any leaks when I did that. Did I bump something while I was swabbing the air cylinder? I don't think I did.

I would love to hear from those with more experience working with this or similar platforms. Thanks!
Also welcome to the HAM forum brother! Great pics and explaining the problem.
 
Man that was nasty. Maybe beef up your pcp compressors air filtration system as too much moisture is getting in your gun? I've got 3 on my main compressor.
Right now I am the compressor 🤣😁. I am using a Air Venturi G9 Hand Pump, so it only has a small filter on the end. This gun has gone for 1,700 shots without a through disassembly and oiling, so I will be doing that more frequently now. Also, thanks I'm glad to be here.
 
Make sure the hammer pin is fully seated and not rubbing on the slot in the pressure tube.

We add a little grease to the hammer. CLP also works.

John
Hi John, I tried what you suggested about adding CLP grease to the hammer and hammer pin. It smoothed the bolt out very nicely (I had been using silicone oil, which was not working as well). Thanks a lot for all your help getting my gun sorted out. I got it all put back together and even got to take it out to do some shooting today. Runs perfectly and holds pressure. You really seem to be quite the airgun guru.
 
A big thanks to everyone for helping me get this sorted out. I have it all put back together and it is running perfect.

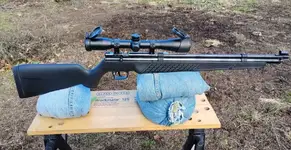
For anyone who is curious, I though I would share a little about this particular air rifle:

1763510842462.webp

I got this Crosman 3622 back in May and have around 1,700 rounds of Crosman hollow point and round nose pellets through it so far. The gun is stock except for the steel breech kit. The scope is a UTG 4x32 with a mildot reticle and a fixed 35 yard parallax. I fill it with an Air Venturi G9 hand pump and it takes about 25 to 30 pumps for 20 good shots. Because of the moisture from the hand pump, I will add cleaning and oiling the valve and valve seal as regular maintenance. It shoots about 1 to 1.25 inch 10-shot groups at 30 yards with Crosman round nose pellets, and I'm sure it could shoot tighter if I get around to figuring out a JSB pellet it likes. Frankly, I have just been really happy with the accuracy I have been getting, as it is leaps and bounds better than the Gamo and Crosman break barrels I had been using. At the moment, I could not be happier with the setup.
 
A big thanks to everyone for helping me get this sorted out. I have it all put back together and it is running perfect.

For anyone who is curious, I though I would share a little about this particular air rifle:

View attachment 17472

I got this Crosman 3622 back in May and have around 1,700 rounds of Crosman hollow point and round nose pellets through it so far. The gun is stock except for the steel breech kit. The scope is a UTG 4x32 with a mildot reticle and a fixed 35 yard parallax. I fill it with an Air Venturi G9 hand pump and it takes about 25 to 30 pumps for 20 good shots. Because of the moisture from the hand pump, I will add cleaning and oiling the valve and valve seal as regular maintenance. It shoots about 1 to 1.25 inch 10-shot groups at 30 yards with Crosman round nose pellets, and I'm sure it could shoot tighter if I get around to figuring out a JSB pellet it likes. Frankly, I have just been really happy with the accuracy I have been getting, as it is leaps and bounds better than the Gamo and Crosman break barrels I had been using. At the moment, I could not be happier with the setup.
Awesome! Mine really loved Norma 17.6gr pellets. I didn't even steel breech mine, just moderator and barrel clamp scope rails from buckrail. Glad you are enjoying it though, continue the fun in the sun.
 
Hi John, I tried what you suggested about adding CLP grease to the hammer and hammer pin. It smoothed the bolt out very nicely (I had been using silicone oil, which was not working as well). Thanks a lot for all your help getting my gun sorted out. I got it all put back together and even got to take it out to do some shooting today. Runs perfectly and holds pressure. You really seem to be quite the airgun guru.
Glad to help!

I like the 3622. It is a fun little rifle. Reminds me that I should probably pull mine out and shoot it some.

John
 
This reminds me that I need to tear down my 3622 and find the reason for its leak. It's only puff of air when shooting. It holds air when not firing. My suspicion is breech o-ring, but need to go hunting and verify...
 

Create an account or login to comment

You must be a member in order to leave a comment

Create FREE account

Create a FREE account on our community. It's easy!

Log in

Already have an account? Log in here.

Trending in this forum

Back
Top