Install the app
How to install the app on iOS

Follow along with the video below to see how to install our site as a web app on your home screen.

Note: This feature may not be available in some browsers.

Others Seneca Aspen Fixed!

Ronno6

HAM Shooter
32
61
HAM Points
259.00
Country flag
I picked up an "untested: Seneca Aspen off the bay.
Of course, it leaked out the barrel.
I ordered an exhaust valve poppet from PA, but it was different than the original and didn't cure the leak anyway.

Next link in the chain was the exhaust valve sleeve.
After chatting with AV, they sent me a new sleeve and stem.

NO MO LEAK.........

The barrel is losing air when fired where it enters the receiver, so new O-rings are en route.

Then the pump arm got REAL stiff...........just needed some silicone oil.
It pumps, it shoots, it holds air!

So, it will shortly be good to go..........where, exactly, I no not as yet........
 
I am waiting for a fill probe to precharge the "balance" chamber.......something I just learned about...
I guess it makes pumping easier ?? Interesting stuff......
 
Well, only partially fixed..........
There is this little tube under the barrel called a "balancer tube." Its function, I guess, is to provide some sort of assist when hand pumping against a pressurized main reservoir. i replaced all the O-rings except 1...the ball check valve O-ring. TRY to find that little bugger.....ANYWHERE.... i put in a call to Air Venturi and was told that they use a different size.....WAY too small... So, I'm waiting for more O-rings now.
 
I more or less finally got the balancer tube sealed and pre-charged...that required a special probe.
Assembled and aired it up.
All went well....for a while.
Apparently the pump check valves needed their O-rings replaced, as air would leak back into BOTH sides of the pump. After pressurizing the main reservoir to 3000psi, it would leak back into the bump, dropping the pressure down to 2200psi, where it would stay. However the pump arm would be almost impossible to open, and, once opened, it would open half way, and be impossible to move either way from there.........either open or close...
So, tiring from this exercise, I listed on the bay and sold it as is.........hopefully the buyer can figure it out....
I'm DONE..............
 
I more or less finally got the balancer tube sealed and pre-charged...that required a special probe.
Assembled and aired it up.
All went well....for a while.
Apparently the pump check valves needed their O-rings replaced, as air would leak back into BOTH sides of the pump. After pressurizing the main reservoir to 3000psi, it would leak back into the bump, dropping the pressure down to 2200psi, where it would stay. However the pump arm would be almost impossible to open, and, once opened, it would open half way, and be impossible to move either way from there.........either open or close...
So, tiring from this exercise, I listed on the bay and sold it as is.........hopefully the buyer can figure it out....
I'm DONE..............
Ya, but your so much more experienced now .. that equals a lot next time.😉
 
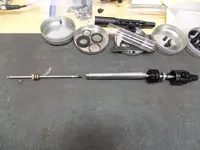
If you don't mind...Looking for info on how to remove this part of the pump, see pencil point. It does not unscrew as I saw in a video by "Big J". It is tightly attached to the black carrier and will take some real torque to separate. It Has wrench flats ground on it but they are not a standard wrench size, metric/inch. I'm afraid I will damage the thin wall tube gripping it with a vicegrip type pliers. Can anyone advise? Thanks.
 

Attachments

  • DSCN0023.webp
    DSCN0023.webp
    383.1 KB · Views: 6
  • DSCN0024.webp
    DSCN0024.webp
    347.7 KB · Views: 6
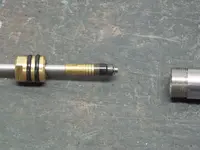
So I was successful in getting to the "small tube". The earlier Aspen had O-rings at the end of the small rod, my version has these three small rings.
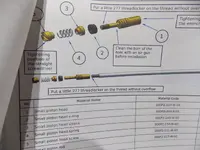
Does anyone have later parts drawings for the Aspen?
Does anyone have a cross-reference to the Seneca O-ring part numbers?
 

Attachments

  • DSCN0025.webp
    DSCN0025.webp
    414 KB · Views: 4
  • DSCN0030.webp
    DSCN0030.webp
    330.6 KB · Views: 4
  • DSCN0027.webp
    DSCN0027.webp
    375.8 KB · Views: 4
If you don't mind...Looking for info on how to remove this part of the pump, see pencil point. It does not unscrew as I saw in a video by "Big J". It is tightly attached to the black carrier and will take some real torque to separate. It Has wrench flats ground on it but they are not a standard wrench size, metric/inch. I'm afraid I will damage the thin wall tube gripping it with a vicegrip type pliers. Can anyone advise? Thanks.
@Jbowhitz Take a look in the attached file.
You may find the answer there

Hope this helps
Edward
 

Attachments

well, I made a tiny error. I wanted to add to this discussion my information on repairing an Air Venturi Aspen Seneca. Instead I added to a different one.
Please see the forum discussion with the link below. You might find it usefull.


Create an account or login to comment

You must be a member in order to leave a comment

Create FREE account

Create a FREE account on our community. It's easy!

Log in

Already have an account? Log in here.

Trending in this forum

Back
Top