Install the app
How to install the app on iOS

Follow along with the video below to see how to install our site as a web app on your home screen.

Note: This feature may not be available in some browsers.

Maintenance Help with Evol .22 15”

Tompetersonhaircut

HAM Shooter
46
102
HAM Points
341.75
Country flag
Hi all,

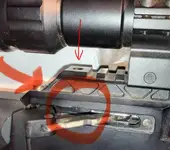
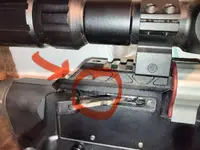
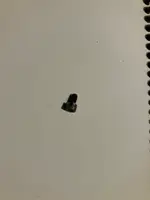
Tonight while confirming zero/working on holdovers for grouse hunting tomorrow, my Evol’s probe stopped retracting fully. I inspected the probe and a small screw was loose in the chamber where the cocking arm/probe run. (Pictures attached)

I looked at the Receiver Assembly schematic on the AAA website and the loose screw looks like the “anti rotation striker” (part # 24 in the RA schematic).

Currently there is a magazine stuck in the gun because the pin probe won’t fully retract.

Has anyone else had this problem? Any ideas on how to go about fixing this? I would love any light that could be shed on this one.
 

Attachments

  • IMG_4803.webp
    IMG_4803.webp
    420.5 KB · Views: 29
  • IMG_4802.webp
    IMG_4802.webp
    29.5 KB · Views: 28
  • IMG_4800.webp
    IMG_4800.webp
    57.4 KB · Views: 28
Last edited:
Hi all,

Tonight while confirming zero/working on holdovers for grouse hunting tomorrow, my Evol’s probe stopped retracting fully. I inspected the probe and a small screw was loose in the chamber where the cocking arm/probe run. (Pictures attached)

I looked at the Receiver Assembly schematic on the AAA website and the loose screw looks like the “anti rotation striker” (part # 24 in the RA schematic).

Currently there is a magazine stuck in the gun because the pin probe won’t fully retract.

Has anyone else had this problem? Any ideas on how to go about fixing this? I would love any light that could be shed on this one.
Sounds bad, but should be easily fixable with some tools. First remove the scope and buttstock from the reciever to gain easier access to the assembly hole and hammer tension spring and adjustment nut. (Your Evol model may need you to remove the reciever from the chassis.) Then remove the hammer spring tension nut and spring. (But first measure the nut's depth/location so you can put it back to the same tension.) Because that screw has backed off the hammer weight should now slide out backwards. At this point clean the hammer and inspect those threads. Hopefully they are good and you can reassemble it. Blue Loctite will be needed when reassembling, placing a small drop in that threaded hole.

Now is a good time to also clean that hammer bore. It needs cleaned and regreased all the way back to and including around the back of the valve body and valve stem. A long, tightly rolled up paper towel would work good to get back to the valve body. (Compressed air from a shop air compressor wand, blowing air into the transfer port works good for driving debris backwards off of the stem. (Though at this stage you can't get to that port).) The reason for cleaning and degreasing the bore and valve stem is debris will collect on the valve stem and be driven into the poppet valve area when the hammmer strikes it. Keeping it clean makes your shot cycle extreme spread more tight and consistent.

Now, replace the hammer weight and carefully slide it forward until you can see the hammer's threaded hole when looking down through that hole in the picatinny rail. That screw is put in through the hole on the picatinny rail and torqued to those thread specs. I would apply some blue Loctite to the screw threads also. Do not use red Loctite. And, it would be best to not disturb or shoot the gun until tomorrow so the Loctite can cure.

Reassemble the buttstock and scope. And, check your scope's zero.
1000009929.webp
 
Sounds bad, but should be easily fixable with some tools. First remove the scope and buttstock from the reciever to gain easier access to the assembly hole and hammer tension spring and adjustment nut. (Your Evol model may need you to remove the reciever from the chassis.) Then remove the hammer spring tension nut and spring. (But first measure the nut's depth/location so you can put it back to the same tension.) Because that screw has backed off the hammer weight should now slide out backwards. At this point clean the hammer and inspect those threads. Hopefully they are good and you can reassemble it. Blue Loctite will be needed when reassembling, placing a small drop in that threaded hole.

Now is a good time to also clean that hammer bore. It needs cleaned and regreased all the way back to and including around the back of the valve body and valve stem. A long, tightly rolled up paper towel would work good to get back to the valve body. (Compressed air from a shop air compressor wand, blowing air into the transfer port works good for driving debris backwards off of the stem. (Though at this stage you can't get to that port).) The reason for cleaning and degreasing the bore and valve stem is debris will collect on the valve stem and be driven into the poppet valve area when the hammmer strikes it. Keeping it clean makes your shot cycle extreme spread more tight and consistent.

Now, replace the hammer weight and carefully slide it forward until you can see the hammer's threaded hole when looking down through that hole in the picatinny rail. That screw is put in through the hole on the picatinny rail and torqued to those thread specs. I would apply some blue Loctite to the screw threads also. Do not use red Loctite. And, it would be best to not disturb or shoot the gun until tomorrow so the Loctite can cure.

Reassemble the buttstock and scope. And, check your scope's zero.
View attachment 16014
Thank you! I am going to work on it today. Appreciate the quick response and the thorough answer.
 
Yes, the fix above helped. There was a pellet lodged halfway out of the magazine, but the probe/hammer/etc are back in working order. I do have a slow leak, so might need to replace o rings/tighten up some nuts (I de-gassed the rifle, as I do out of an abundance of caution when doing any maintenance.)

If the leak continues (it was slightly leaking before this it might be a sign that it’s a good time to get a tear down/clean and total o-ring replacement going.
 
Thank you! I am going to work on it today. Appreciate the quick response and the thorough answer.
Yes, the fix above helped. There was a pellet lodged halfway out of the magazine, but the probe/hammer/etc are back in working order. I do have a slow leak, so might need to replace o rings/tighten up some nuts (I de-gassed the rifle, as I do out of an abundance of caution when doing any maintenance.)

If the leak continues (it was slightly leaking before this it might be a sign that it’s a good time to get a tear down/clean and total o-ring replacement going.
Many thanks to all for the help and follow up. I appreciate the community here!
 
nice I have a fiberglass rod from a old kite I use for pushing pellets of of differant guns when needed.
have you located the leak?
if not check the froster fitting they are the first place I would look easy fix.
when I worked in the ship yard we would use a tablespoon a dawn dish soap to about a gal of water and a spray bottle to check for leaks in tanks they will show up good. I have not had as good a luck with other brand but the dawn it the ticket for the dish soap.
 
Last edited:
nice I have a fiberglass rod from a old kite I use for pushing pellets of of differant guns when needed.
have you located the leak?
if not check the froster fitting they are the first place I would look easy fix.
when I worked in the ship yard we would use a tablespoon a dawn dish soap to about a gal of water and a spray bottle to check for leaks in tanks they will show up good. I have not had as good a luck with other brand but the dawn it the ticket for the dish soap.
You make a couple of great points here. Push rods are always in my gear now. More than once in the past I've had a hunt or shooting session cut short because I needed a push rod to move a jammed pellet. Also, just discovered that I have the common slow leak (common slow leak from any airgun's fill probe) going on in my Magnon. After a while these fill o-rings simply get burnished from high pressure air zipping in, then their elasticity leaves and get permanently squished so air slips by them.
 
You make a couple of great points here. Push rods are always in my gear now. More than once in the past I've had a hunt or shooting session cut short because I needed a push rod to move a jammed pellet. Also, just discovered that I have the common slow leak (common slow leak from any airgun's fill probe) going on in my Magnon. After a while these fill o-rings simply get burnished from high pressure air zipping in, then their elasticity leaves and get permanently squished so air slips by them.
Definitely used a cleaning rod to pop out the pesky pellet.

I am pretty sure there’s a slight leak at the foster fitting as I placed a rubber cap (dust cover) over it and it popped off. So, o rings it shall be. Thanks again y’all!
 

Create an account or login to comment

You must be a member in order to leave a comment

Create FREE account

Create a FREE account on our community. It's easy!

Log in

Already have an account? Log in here.

Trending in this forum

Back
Top