Install the app
How to install the app on iOS

Follow along with the video below to see how to install our site as a web app on your home screen.

Note: This feature may not be available in some browsers.

Marauder G3, The Things I Do For Fun

Some interesting findings today. I started out by zeroing with 28gr Zan slugs at 16y and they were going through the same hole. Good. Shot a reaction target at 83y no problem. Good. Tried to move my tripod and shoot a group on paper at 94y and 10x isn't really enough for my eyes any more, but excuses aside, I only had 4 in the mag and shot two groups of two an inch left at 8 and 10 o'clock. Not good. So, back to my 53y shooting spot where I tethered the gun and shot groups with both slugs and pellets and the slugs seemed to be doing a little bit better, but most groups were nickle, not dime sized. Not good.

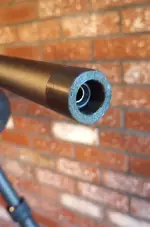
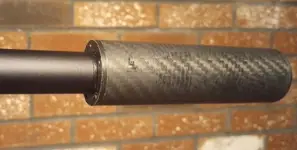
I decided to take off the Terminador carbon fiber shroud and just try shooting with the STO Levitas moderator. Wow! I have never seen such an effect as what that did. The gun's poi was now off by 6", but once corrected shot some really tight groups. I put the carbon fiber shroud back on and the poi was way off again, differently. So there is no way that I will use something that will not return my zero back after take down and re-assembly, not even closely. So much for that little experiment, I put the factory shroud and moderator back on. I don't want to run the Levitas with the factory shroud until I come up with a way to hold the barrel in the center of the shroud, along with some type of washer so that the thin shroud wall doesn't dig in, over time, to my regulator, which is just plastic on the end.

Free floating the barrel with the shroud and it's collet, not pulling on the barrel or the block, seems to be the most stable option to me at this point. I am not at all interested in doing any kind of barrel band off of a bottle either, so that's that. Bummer, the carbon fiber looked good, was light and strong, just didn't work out. If I was going to use this gun for any type of competitive shooting I would not run it with the shroud on at all. It really shoots the best w/o it on but I just don't like the look of not running one. I imagine that when others do what I am doing, and see what I am talking about, someone will make an adapter (maybe DonnyFL) to put in the end of the shroud to center the barrel and provide a flat shoulder to screw your moderator onto. I will buy that in a heartbeat.
Very interesting. I always wonder how all these shrouds affect these rifles compared to if they were truly free floated like a lot of PBs. In what way do you think the shroud is influencing the rifle? I’m assuming the barrel on the F3 is a solid and secure fitting. I’m just trying to learn what I can from your experience so far.
 
Some interesting findings today. I started out by zeroing with 28gr Zan slugs at 16y and they were going through the same hole. Good. Shot a reaction target at 83y no problem. Good. Tried to move my tripod and shoot a group on paper at 94y and 10x isn't really enough for my eyes any more, but excuses aside, I only had 4 in the mag and shot two groups of two an inch left at 8 and 10 o'clock. Not good. So, back to my 53y shooting spot where I tethered the gun and shot groups with both slugs and pellets and the slugs seemed to be doing a little bit better, but most groups were nickle, not dime sized. Not good.

I decided to take off the Terminador carbon fiber shroud and just try shooting with the STO Levitas moderator. Wow! I have never seen such an effect as what that did. The gun's poi was now off by 6", but once corrected shot some really tight groups. I put the carbon fiber shroud back on and the poi was way off again, differently. So there is no way that I will use something that will not return my zero back after take down and re-assembly, not even closely. So much for that little experiment, I put the factory shroud and moderator back on. I don't want to run the Levitas with the factory shroud until I come up with a way to hold the barrel in the center of the shroud, along with some type of washer so that the thin shroud wall doesn't dig in, over time, to my regulator, which is just plastic on the end.

Free floating the barrel with the shroud and it's collet, not pulling on the barrel or the block, seems to be the most stable option to me at this point. I am not at all interested in doing any kind of barrel band off of a bottle either, so that's that. Bummer, the carbon fiber looked good, was light and strong, just didn't work out. If I was going to use this gun for any type of competitive shooting I would not run it with the shroud on at all. It really shoots the best w/o it on but I just don't like the look of not running one. I imagine that when others do what I am doing, and see what I am talking about, someone will make an adapter (maybe DonnyFL) to put in the end of the shroud to center the barrel and provide a flat shoulder to screw your moderator onto. I will buy that in a heartbeat.
Have @Billm print you up something to glue in both ends of your shroud.
 
After I wrote that post, I realized that I already came up with the solution to my problem. I just checked, and the the Terminador 3D printed end cap for the cabon fiber shroud will do the job perfectly. I just have to cut it down to leave the threads exposed to tighten the moderator on. So I will get some use out of it after all. I'll post pics when I'm done.
 
I once suggested in a thread on a different forum that I could not understand why manufacturers continue to make air rifles with shrouds??? Of course there was a lot of push-back and personal opinions suggested on that thread.

Shrouds on air rifles came about as a means to apply baffles to help silence the rifle's report. That at a time when it was unclear about the legality of suppressors on airguns in the USA. So, I still contend that there is more problems to be had with a shroud on a barrel than if there was no shroud at all. If air rifle designers would just build rifles with steel barrels, appropriate diameters, and quality rifling with accurate bore dimensions we consumers would all be much happier.

Sorry, Pumacarl that this remark does nothing to help resolve your problem. But, your writing just reminded me about my thoughts regarding barrel shrouds on current manufactured air rifles.

Go ahead boys, fire away! :LOL:
 
I once suggested in a thread on a different forum that I could not understand why manufacturers continue to make air rifles with shrouds??? Of course there was a lot of push-back and personal opinions suggested on that thread.

Shrouds on air rifles came about as a means to apply baffles to help silence the rifle's report. That at a time when it was unclear about the legality of suppressors on airguns in the USA. So, I still contend that there is more problems to be had with a shroud on a barrel than if there was no shroud at all. If air rifle designers would just build rifles with steel barrels, appropriate diameters, and quality rifling with accurate bore dimensions we consumers would all be much happier.

Sorry, Pumacarl that this remark does nothing to help resolve your problem. But, your writing just reminded me about my thoughts regarding barrel shrouds on current manufactured air rifles.

Go ahead boys, fire away! :LOL:
I think you have a valid point. I do like the shroud on my Ghost though. That gun is very quiet because of well designed stripper and shroud combo.
 
Last edited:
I once suggested in a thread on a different forum that I could not understand why manufacturers continue to make air rifles with shrouds??? Of course there was a lot of push-back and personal opinions suggested on that thread.

Shrouds on air rifles came about as a means to apply baffles to help silence the rifle's report. That at a time when it was unclear about the legality of suppressors on airguns in the USA. So, I still contend that there is more problems to be had with a shroud on a barrel than if there was no shroud at all. If air rifle designers would just build rifles with steel barrels, appropriate diameters, and quality rifling with accurate bore dimensions we consumers would all be much happier.

Sorry, Pumacarl that this remark does nothing to help resolve your problem. But, your writing just reminded me about my thoughts regarding barrel shrouds on current manufactured air rifles.

Go ahead boys, fire away! :LOL:
Actually in this case, you are exactly correct if trying to use the Terminador way of doing it. The Gen3 system doesn't really effect anything but the looks of the gun. I am going to try to explain that in a post I am going to do now with pictures. I will add that I like even back-to-front fat shrouds for their looks (no silencer bulge on the end) and their effectiveness for sound mitigation when they are active expansion chambers, better than screwing on an additional silencer when they work right. I don't like the weight of the fat "real" barrels on airguns much, unless they are bench guns.
 
Last edited:
Very interesting. I always wonder how all these shrouds affect these rifles compared to if they were truly free floated like a lot of PBs. In what way do you think the shroud is influencing the rifle? I’m assuming the barrel on the F3 is a solid and secure fitting. I’m just trying to learn what I can from your experience so far.

Bill, the shroud on the Gen3 is connected to the barrel via the collet in front of the block. If you notice in my picture, that collet receives the shroud and has a lip on the end so the shroud does not push against the block at all. The collet is held in place by a bulge in the barrel, that you can't see when it's on and prevents it from sliding forward on the barrel, and a set screw to stop it from spinning. This makes it a totally on barrel system that does not stress it to the block at all, just itself. Nothing is pulling on the barrel this way, in other words.

shroudcollet.webp

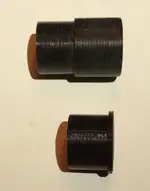
The Terminador system does not use fixed collets, it floats. So when you tighten down the moderator on the end, it compresses the shroud and pulls on the barrel in the gun, held there by the two screws coming from the top of the receiver. It makes the compressed shroud very rigid, but as I found out, changes poi big time, every time you take off your moderator. If you don't mind re-zeroing every time you have your gun apart, this isn't much of a problem, but I didn't like the amount of the change. These are what the 3D printed shroud ends looked like, one is what I cut down to use on the end of the factory aluminum shroud.

ti3decba.webp

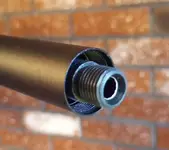
The problem with the factory shroud is that it floats in the end of the shroud until you put on the factory moderator which screws into the shroud, not onto the barrel, to take up the space. If you want to use your own moderator you are tightening down on a barrel in a shroud that is floating. How do you know if it's centered? You really don't, which I don't like. And, then you are tightening against the end of a very thin shroud, again, which I don't really like. So, I took the Terminador shroud end and cut one down so that I could use it on the end of the shroud to center the barrel and protect the shroud end and moderator from each other.

bins.webp

Before cutting.

tecinoems.webp

After cutting.

resizedec.webp

STO Levitas in place.

stom.webp

This is a solution that I can live with.

Edit: Also, I wanted to add, that now the shroud is actually being tensioned between the collet and moderator, so it could potentially help with harmonics too. The factory way of doing it has no tension. It will be interesting to see how that works out.
 
This is the second time I didn’t get the Panthera out in time for a coyote about 35 yards beyond our fence line. Not as fast as I was in my younger years!!🤣🤣😂🤣😂😢😢😢
With all my airguns, I had a woodchuck walk by my place while I was in the middle of grilling some huge porterhouse steaks this weekend! It's almost like he knew I wasn't about to screw up a good steak just for him, and he was right.
 
Very interesting entry. Thank you. The alternative might be to check Airgun Revisions (Good website) as they have a carbine model available, Less weight and less length.
I knew about it. I bought this model from Airgun Revisions. I'm done with short guns, they're handy but I don't shoot them as well anymore. I also wanted to keep my options open for slinging heavy slugs since this gun has the power to send them. Just taking the weight off the front like I did made on huge difference in hold feel and swing weight. I made the right call for me. Welcome to HAM!
 
I re-zeroed tonight at 16y using the 34gr MkII pellets and then went straight to some 84y reaction targets and was hitting all of them easily. A good scope and Strelok feels like the ultimate cheat code, I love it!

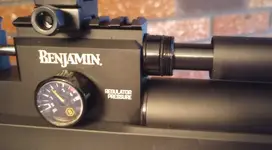
It's time to talk about the magazine. I happen to not hate this type of magazine like a lot of people do. I find that they are inexpensive and work well with both pellets and slugs. This particular version is freakin' huge! No worries about anything fitting in this thing. With that said, I will say something rather negative about this particular version that really bugs me. This magazine is, like I said, huge. All the other magazines of this type that I have are smaller and have a much clearer and easier to read shot count window than this has. The window on this magazine is unreadable to me, the numbers are barely there, AND they are not painted white! I can barely read them with a flashlight. I really want to see this change. I usually buy enough magazines to cover how many shots I can do on a fill. I won't be buying more of these unless they do a better job with the window and readability. I had tried tonight to put some paint in the numbers but they are so barely there that it all comes out when I go to wipe off the excess paint. Usually this is an easy thing to do. The aftermarket hasn't kicked in yet, I checked. I will continue to keep checking for improvements from Benjamin and the aftermarket. I'll post when something changes.
 
I finally shot down from a full 3600psi fill and got 3 full magazines(36shots) down to 1750psi. I'm using 50psi a shot at 61fpe. My Gen2, can only get 7 shots at 58fpe and uses 100psi a shot to do that. So, 5x the shot count (and that's with my smaller 360cc bottle) and super easy cocking, makes the G3 much nicer to just sit and shoot with, that's for sure. It was another hot one today but I've got to try this again with the 28gr slugs and see if the shot count is the same.
 
Last edited:
No pictures today. Nothing you haven't seen, just polishing the barrel and I put the gun back together. I left the barrel off for now.

When putting the plenum, with the regulator installed, back onto the block you have to make sure that they are clocked to each other. In my case, it has to be perfectly, or the bottle will touch because I've only got paper thick clearance between the stock and the bottle. The plenum is clocked at assembly with rubber and plastic washers, very well too. I had dropped a very thin plastic clocking washer and had't realized it and it was way off. Once I noticed it was missing I looked for it and actually found it right under my chair, got lucky on that one. I mention this only because you don't actually need to use the washers. Much like other bottle guns with guages on bottle-end regulators you can just clock your regulator block to your receiver block without actually tightening them all the way down. You just tighten down as much as you can and then back off enough to match and then fill your gun with air and the pressure will hold it in place. I have to do that with my Gauntlet so I know it works. Benjamin's washers worked perfectly for me and my bottle passed the paper test. I'm pretty happy about that.

Here is the big news of the day. I saved it until now so only people interested enough to read this far will see it. I am only mentioning this because I actually did nothing to the gun that I can't actually change back in a minute flat. I am of course talking about the trigger. First off, I think the trigger's side plate should be clear lexan so that you can watch what's happening when you adjust it, instead of black plastic. I mentioned that to @BenjeneerJohn and he said that they actually use a clear one at the factory but never thought to just send the trigger out with those. I thought that was pretty funny! Anyways, I adjusted my trigger with the plate off to what looked good to me, and it ended up being very good. It ended up being very good though becuse it was much lighter. I had originally had it adjusted down to 24oz which wasn't bad but it was all up front and I couldn't get the weight down any more. Looking at everything, I decided to put a lighter spring in, that's it. I did not stone or sand any parts or change anything else. I just took out one little spring and put in a slightly less stiff one. If there is a disadvantage to this or a safety issue, I don't know, but it's my gun and I'll do what I want, and pay the price. If you don't feel the same way, then don't touch yours at all, it's totally acceptable as is. And no I don't have any specifics on spring type or rate or even cut length and if I did it wouldn't matter because every gun is different, you have to know what you are doing and figure out that stuff for yourself. My trigger didn't actually change that much weight wise but I got a true lower first stage now. It is now 14oz first stage and 18oz second and the travel isn't bad either, I'm leaving it. Don't do anything at all to your trigger if you consider it any kind of a risk. I only decided to mention this because I am grateful that someone was kind enough to post about the "Lawyer Spring" in my Gen2 Marauder, and how to disable it, to end up with a truly great trigger, so I'm paying it forward. I'm not suggesting that you do anything, just commenting on what I did.

Tomorrow, I get back to installing my Arca Swiss plate.
I’ve played quite a bit with the trigger today and I was unable to get it below 24oz. Looking at it I decided that it would probably need a lighter spring on “A”. I decided to search and see if you had modified your trigger. I have a memory like a sieve, but now I remember your post. It confirms what I thought. I actually really like the trigger compared to some of my other airguns. I would just like to see it lighter. The first stage feels a little different to me, I’m used to the first stage being lighter than the second stage. But, I have no problem shooting it as is, once I got used to it. Now, I’ve got to decide if I want to swap out the spring.
 
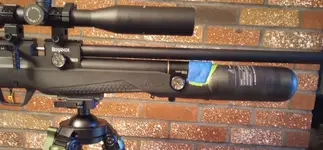
Well, I've been at it again. I decided to try to tackle the bottle gap.

dontlikegap1.webp

I don't have a 3d printer and this would probably be a nightmare designing anyway so I went for my "go to" JB Weld SteelStik. I figured that I had better mock it up with clay to get an idea of how much that I would actually need.
claymodel2.webp

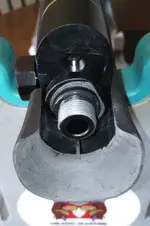
I didn't want to run out mid-mixing and applying. The area under the bottle, I also filled with clay, just so nothing could get down in there after. Upon inspecting where the JBSS would be going, I noticed the flat portion of the bottle receiver nut has a wrench flat, which I will use as a lock for rotaion and movement, front to back, -handy.
workarea3.webp

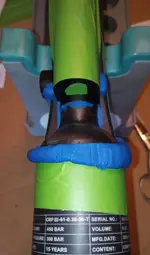
Now I just had to clay up all potential locks and seams, and apply a lot of release agent.
prep4.webp

I kind of screwed up right here, and I knew it at the time, but I didn't have a better solution than just doing a lot more work later. The problem was that I should have put tape all over the bottle, to give it some room afterwards. The problem with doing that, was that because its so curvy there would be wrinkles in the tape, or seams, if I cut a ton of small pieces, which would then make it harder to spin the bottle later, if I had to, to remove it. Between doing all that, or just sanding more later, I chose sanding.

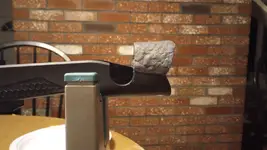
I had originally planned to mix all of the epoxy at the same time, but after getting all my stuff together, and practicing the things that I would have to do, I realized there was no way I could do that by myself. So I mixed about a tablespoon of it at a time and just kept going. Doing it this way kind of stinks. This stuff is hard in five minutes. Everytime you add some on, there is a chance that there will be an air pocket, no matter how much you try to knead it in, or the chemistry will be a little different from batch to batch, and it will show in the end. You have to think big-picture and just keep going as fast as you can and try to apply to the last batch you did, throughout the process. Just a little bit too much, here and there, makes for a lot more work later; try to be too careful and the problems are even worse. Momentum is your friend, even if your friend is a sloppy drunk, case in point:
ugly5.webp

Even worse.

uglyfront6.webp

There was a whole lot of file work, and sanding, after this! My brothers (tradesmen, carpenters) were telling me to use power tools, and I have them, but no way. I always end up doing too much when I try to save time, that doesn't need saving.

I had planned to incorporate rare earth magnets to hold this on to the stock, but found out that they wouldn't even be necessary. The solution to hold this down was already done for me. The wrench flat on the bottle nipple is open behind the bottle when it is screwed on. Well, that spot made this piton:

finished7.webp

That piton sticking up, gets pinched by the bottle, locking it to the receiver. It can't go anywhere.

Now I will address what many have probably been thinking about since I started this, "what about the regulator adjustment?" What about it? I don't care. I rarely adjust my regulator after the inital time, and if I have to then it's like all my other guns with internal regs, I gas down and take'em apart.

I spent a lot of time chasing my tail trying to clean up the JBWeld's finish. I had some deep pock marks that I had to mix micro amounts and fill with. Then the lines would show up, and I'd sand some more, add some more, etc.... I don't think that I like the look that I chose and might change it at some point too. I am thinking of using a 1" sanding drum at 10 and 2 o'clock and change the transition between top and bottom to more of an "S" shape. I am kind of fed up with it at the moment, but that will pass and I will take another look at it. I'd like to get this scanned and put into a printable file, then I could try a lot of different things, and it would weigh a lot less. JBWeld is heavy stuff, this weighs 3.5 ounces! I'm not happy about that either, that's why I was thinking about reducing it by changing the style.

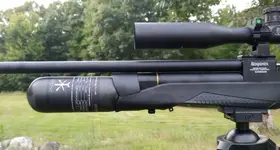
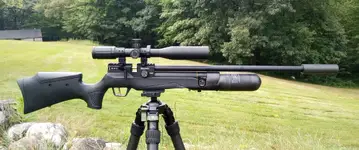
Anyway, here's the pictures of where I left it, for now:
ls9.webp

The back wraps the receiver block on both sides, the piton holds it down.
fullr10.webp

topv11.webp

front12.webp

I'll give myself a "C" on this one, only because it was my first attempt. Otherwise, a "C-" because I can do better but I was getting impatient, which is never good. I did get rid of the gap anyway.

 
It looks good. Your hard work sure pays off.

A tip for future projects where you want to create a lightweight, easily sandable
/shapeable epoxy contour. Go on Amazon and buy a small bottle of micro balloons. They’re microscopic glass spheres that are mixed with epoxy to make a strong but lightweight , gap filling and easy to contour mixture. It’s used to create lightweight contours and fillets etc., Think of the smooth aerodynamic contours where the wing meets the fuselage. It cuts the weight of epoxy drastically. I would think you could use small amount with epoxy putty as well. It’s so light that a pint bottle feels empty.
 
Small update: I aired the G3 back up and just for no reason at all I looked through the STO Levitas moderator and saw that it failed. Some material inside had blown out. Bummer! So, the Tanto .30 went on instead, the Ronin is too heavy to leave on all the time.

I think it actually looks better anyway. Good thing, because it is heavier and louder than the Levitas was, so it needs to have something going for it.

tantog3.webp
 

Create an account or login to comment

You must be a member in order to leave a comment

Create FREE account

Create a FREE account on our community. It's easy!

Log in

Already have an account? Log in here.

Trending in this forum

Back
Top